smartphone food photography · phone food photos restaurant · restaurant photography guide · food photography tips
How to Take Professional Food Photos With Your Phone: A Guide for Restaurants
Lighting, angle, background, and the condition of the dish matter more than the camera. A complete step-by-step guide, common mistakes, and a 60-second checklist for smartphone food photography.
You don't need a professional camera to take a good food photo.
Modern smartphones are capable of producing high-quality images that work for restaurant menus, websites, social media, Google Business Profile, and food delivery platforms. The difference between an unappealing smartphone snapshot and a strong food photograph often has less to do with the camera and more to do with how the photo is taken.
Lighting matters.
The angle matters.
The background matters.
And perhaps most importantly, the condition of the food at the moment you photograph it matters.
For restaurants, learning how to take better food photos with a phone can solve another practical problem: speed.
Menus change. New dishes appear. Seasonal specials launch. A cocktail is added. A delivery platform needs an updated image.
Organizing a professional photoshoot every time something changes isn't always practical.
A smartphone gives restaurant teams the ability to capture new dishes immediately. Editing tools and AI food photography can then help improve those images when additional polish, consistency, or background control is needed.
But technology works best when the original photograph is good.
This guide explains how to take professional-looking food photos with your phone, from preparing the dish and finding the right light to choosing camera angles, controlling backgrounds, editing your images, and using AI when a smartphone photo alone isn't enough.
Can You Really Take Professional Food Photos With a Phone?
Yes, with some limitations.
The cameras inside modern smartphones are technically capable of producing excellent food photography, particularly for digital use.
For Instagram, delivery platforms, Google listings, digital menus, and many restaurant websites, a carefully taken smartphone photograph can be more than sufficient.
The mistake is assuming that owning a good phone automatically produces good photography.
It doesn't.
Professional food photographers don't create better images simply because they own expensive cameras. They also understand:
- Lighting
- Composition
- Camera angles
- Food styling
- Color
- Backgrounds
- Visual storytelling
A smartphone doesn't make those decisions for you.
The good news is that restaurants don't need to become professional photographers to improve their images significantly.
A few practical changes can make a dramatic difference.
Before buying new equipment or opening an editing app, focus on five things:
The freshness of the dish.
The quality of the light.
The camera angle.
The composition.
The background.
Get these right first.
Everything else becomes easier.
Before Taking the Photo: Prepare the Food
Good food photography starts before you touch the camera.
Food changes quickly after it leaves the kitchen.
A freshly prepared pasta dish may look glossy and vibrant when it arrives at the table. Ten minutes later, the sauce may begin to dry.
A burger can lose its structure.
Fresh herbs can wilt.
Ice cream melts.
Foam disappears from drinks.
Cheese hardens.
The best moment to photograph a dish is usually shortly after it has been plated.
If you are photographing several dishes, don't prepare the entire menu at once and leave everything waiting.
Whenever possible, photograph dishes individually as they come from the kitchen.
Clean the plate
Before taking the photo, inspect the edges of the plate.
Look for:
- Sauce splashes
- Fingerprints
- Crumbs
- Water marks
- Accidental drips
These details may seem insignificant when looking at the plate in person, but they can become surprisingly visible in a photograph.
A quick clean around the edge of the plate can immediately make the image feel more professional.
Check the presentation
Look at the dish through the phone camera before taking the photograph.
The camera sees the food differently from your eyes.
Something that looks balanced from your seat may look crowded or flat on screen.
Check whether the main ingredients are visible.
If the defining ingredient is hidden underneath something else, consider whether the plating can be adjusted, but don't fundamentally change the dish just to make the photograph more impressive.
The goal should be to present the food at its best while still representing what customers actually receive.
Step 1: Find the Best Light
If you improve only one thing about your smartphone food photography, improve the lighting.
Good light can make a simple phone photo look professional.
Bad light can make excellent food look unappetizing.
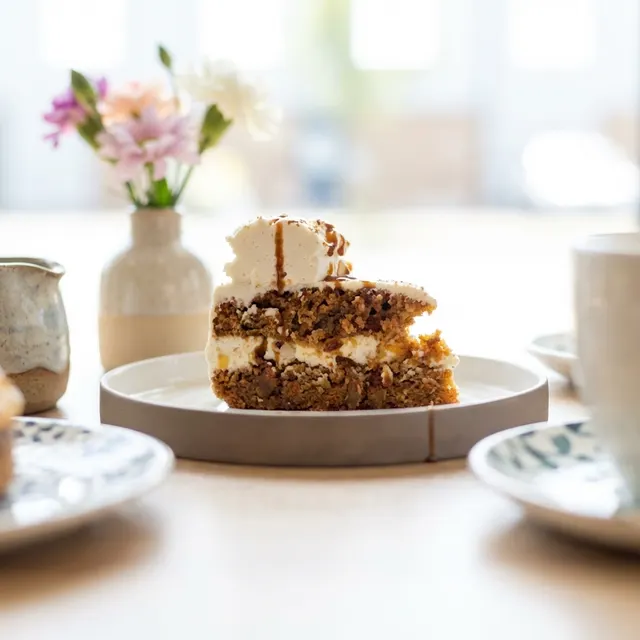
Use natural window light when possible
For most restaurants, one of the easiest sources of good food photography lighting is a large window.
Place the dish close to the window rather than directly in front of it.
Light coming from the side can reveal:
- Texture
- Shape
- Layers
- Sauces
- Surface details
This creates depth.
Try rotating the plate while watching your phone screen. Small changes in position can dramatically change how the food catches the light.
Avoid harsh direct sunlight
More light is not always better.
Strong direct sunlight can create:
- Harsh shadows
- Overexposed highlights
- Extreme contrast
- Distracting reflections
If sunlight is hitting the table directly, move slightly away from the window or diffuse the light with a translucent curtain.
Soft, indirect daylight is usually easier to work with.
Be careful with mixed lighting
Restaurants often use warm interior lighting.
Daylight is generally cooler.
When both light sources illuminate the same dish, the phone may struggle to determine the correct white balance.
The result can be strange colors.
One side of the plate may look yellow while the other looks blue.
If you're photographing close to a window, try temporarily switching off the artificial lights directly above or around the table.
Compare the result.
How to photograph food in a dark restaurant
Dark restaurants are one of the most difficult environments for smartphone food photography.
Your phone may compensate for low light by increasing sensitivity, which can produce grainy or soft images.
The first solution should not be direct flash.
Instead, try:
- Moving the dish closer to a window
- Photographing during daylight hours
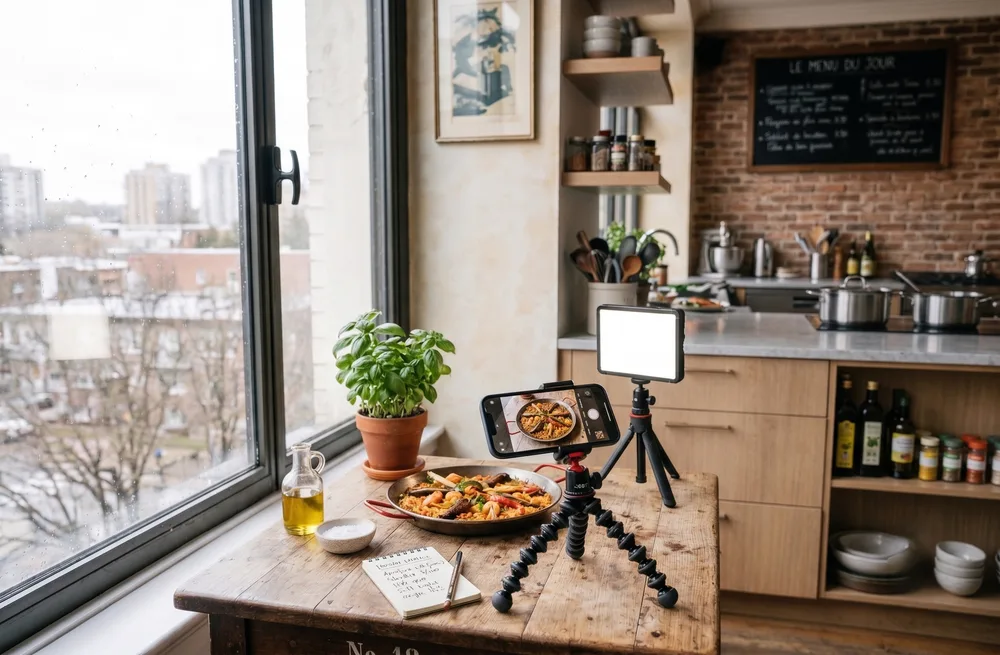
- Using a small continuous LED light
- Reflecting available light with a piece of white card
- Moving the light closer rather than increasing its intensity
If another phone is available, its flashlight can sometimes provide additional illumination, but avoid pointing it directly at the food.
Try bouncing or diffusing the light instead.
Avoid direct phone flash
The built-in flash on a smartphone usually produces very flat, harsh light.
It can create:
- Strong reflections
- Unnatural highlights
- Hard shadows
- Washed-out textures
There are situations where flash photography can be used creatively, but for straightforward restaurant menu photography, direct smartphone flash is usually not the easiest approach.
Step 2: Clean Your Camera Lens
This sounds almost too simple to mention.
Do it anyway.
Smartphone cameras are constantly touched, placed on tables, carried in pockets, and used inside environments filled with steam and grease.
A dirty lens can create:
- Haze
- Reduced contrast
- Softness
- Light streaks
- Flare
Before photographing food, wipe the camera lens with a clean microfiber cloth.
It takes five seconds.
The difference can be significant.
Step 3: Choose the Right Camera Angle
There is no single best angle for food photography.
The best angle depends on what makes the dish visually distinctive.
Three angles work particularly well for restaurant food photography.
90 degrees: Overhead photography
The camera is positioned directly above the food.
This angle works well for dishes where the most important visual information is on the surface.
Good examples include:
- Pizza
- Flatbreads
- Breakfast plates
- Salads
- Bowls
- Table spreads
- Multiple dishes photographed together
Overhead photography is also useful when you want to show several items within one composition.
Be careful with very tall dishes.
A burger photographed directly from above may lose the layers that make it appealing.
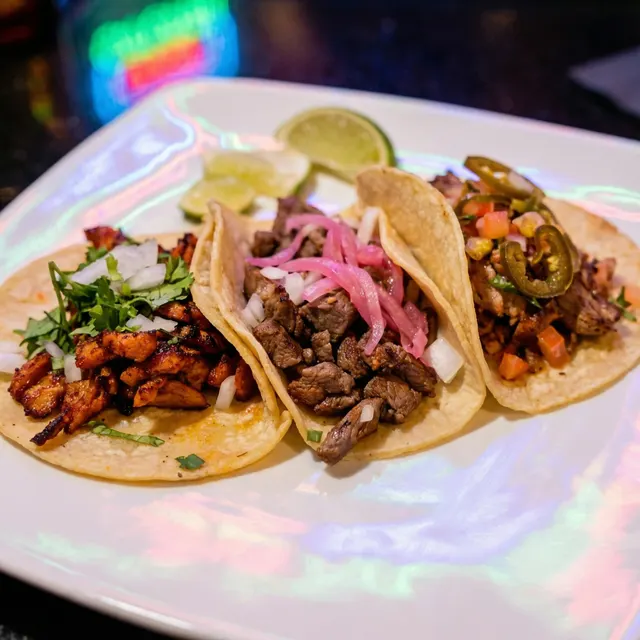
45 degrees: The diner's perspective
This is one of the most versatile angles in food photography.
The camera looks slightly down toward the plate, similar to the perspective someone might have while sitting at the table.
It works well for:
- Pasta
- Main courses
- Salads
- Rice dishes
- Plated fine dining
- Desserts
The 45-degree angle allows you to see both the top of the dish and some of its height.
If you don't know which angle to start with, this is often a good choice.
0 to 20 degrees: Eye-level photography
A low angle is useful when height or layers define the dish.
Think about:
- Burgers
- Sandwiches
- Layered cakes
- Pancake stacks
- Drinks
- Tall desserts
A burger photographed from above becomes a circle.
Photographed from the side, you can see the bun, meat, cheese, vegetables, and sauce.
The general principle is simple:
Photograph the feature that makes the dish distinctive.
If the beauty is on top, photograph from above.
If the height matters, move lower.
If both matter, try 45 degrees.
When photographing a new dish, take all three angles.
You can decide which one works best later.
Step 4: Get the Composition Right
Composition determines how the elements inside the image relate to each other.
You don't need to study complex photography theory to improve your composition.
Start with a few practical principles.
Keep the subject clear
The viewer should immediately understand what the photograph is showing.
If the image is about a plate of pasta, don't surround it with so many glasses, flowers, napkins, cutlery, and decorations that the pasta becomes secondary.
Props can create atmosphere.
Too many props create distraction.
Try centered composition
For delivery apps and digital menus, simple compositions often work best.
Placing the dish near the center of the frame makes it easy to recognize, even when the image appears as a small thumbnail.
This also provides some protection against automatic cropping.
Use the rule of thirds
Most smartphones allow you to activate a grid inside the camera app.
The grid divides the image into nine sections.
Instead of always placing the main subject exactly in the middle, try positioning important elements along the grid lines or intersections.
This can create a more dynamic composition.
Leave negative space intentionally
Empty space isn't necessarily wasted space.
If the image will be used on a restaurant website or in an advertisement, negative space can provide room for:
- Headlines
- Logos
- Prices
- Promotional messages
Think about the final use of the image while taking the photograph.
Different channels need different compositions
A photograph created for Instagram may not work perfectly on a delivery platform.
For example:
Delivery apps: clear, simple, dish-focused.
Instagram: more creative composition and atmosphere.
Website: may require negative space for design and text.
Google Business Profile: can benefit from more environmental context.
Whenever possible, take several compositions while the dish is already in front of you.
That gives you more flexibility later.
Step 5: Control the Background
A strong dish can be undermined by a distracting background.
Common problems include:
- Dirty tables
- Kitchen equipment
- Cleaning products
- Random packaging
- Used glasses
- Staff walking behind the dish
- Bright objects
- Messy cables
- Unrelated signage
Before taking the photo, look beyond the food.
Ask yourself: what else is the camera seeing?
Sometimes the easiest solution is simply moving the plate 50 centimeters.
Use the restaurant itself
If your restaurant has a distinctive interior, consider using it.
A recognizable table surface, wall, bar, or architectural detail can help connect the image to the restaurant's identity.
This is particularly useful for:
- Websites
- Google Business Profile
- Brand content
The background shouldn't overpower the dish.
But it can help tell the viewer where the food belongs.
When a neutral background makes sense
For menu item photography and delivery apps, a simple background can improve clarity.
Neutral surfaces help the viewer focus on the food.
The trade-off is identity.
If every restaurant photographs food on the same white or marble surface, the images may look clean but generic.
Choose the background based on the purpose of the image.
Step 6: Use the Right Smartphone Camera Settings
You don't need to become a technical photographer, but a few camera settings can significantly improve your results.
Use the main rear camera
The main camera on your phone usually provides better image quality than the front-facing camera and may perform better than secondary lenses in low light.
Use it whenever practical.
Avoid digital zoom
Digital zoom often reduces image quality.
Instead of zooming with your fingers, physically move closer to the food when possible.
Be careful not to move so close that the phone's wide-angle lens distorts the plate.
Tap to focus
Before taking the photograph, tap the most important part of the dish on your screen.
For example: the center of the burger, the main ingredient, or the front edge of a dessert.
Make sure the food, not the background, is the focus.
Adjust exposure manually
After tapping to focus, most smartphone cameras allow you to adjust exposure by sliding your finger up or down.
Food photography often looks better slightly darker than heavily overexposed.
Watch bright areas carefully.
Once highlights are completely white, details can be difficult to recover.
Turn on grid lines
Grid lines help with:
- Alignment
- Centering
- Rule of thirds
- Overhead photography
They are particularly useful when photographing plates from directly above.
Be careful with portrait mode
Portrait mode can create an attractive blurred background.
But it can also make mistakes.
The software may incorrectly blur:
- Plate edges
- Cutlery
- Garnishes
- Glasses
- Parts of the food
Always inspect the result carefully.
A naturally composed photograph with a clean background is often safer than an artificial blur.
Shoot at high resolution
Use the highest practical image quality available on your phone.
Even if the final image will be smaller, higher-resolution originals provide more flexibility for cropping and editing later.
Step 7: Take More Than One Photo
Professional photographers rarely take one photograph and stop.
Neither should you.
You don't need to take 100 images.
But don't rely on a single shot.
A simple workflow could be: 3 camera angles times 2 distances times 2 compositions.
That gives you 12 options in a few minutes.
Try: one overhead, one 45-degree, one low-angle.
Then: close, wider.
Then: centered, off-center.
Once the food is gone, recreating exactly the same dish may be difficult.
Taking a few extra photographs costs almost nothing.
Step 8: Edit Without Making the Food Look Fake
Editing should improve the photograph.
It shouldn't transform the dish into something customers won't recognize.
Basic adjustments can include:
- Exposure
- White balance
- Contrast
- Highlights
- Shadows
- Sharpness
- Saturation
The most common mistake is over-editing.
Don't oversaturate colors
Increasing saturation can initially make food look more appealing.
Push it too far and tomatoes become unnaturally red, greens become fluorescent, and meat may appear cooked differently from reality.
Use small adjustments.
Correct the white balance
Restaurant lighting can make food appear too yellow or orange.
Correcting white balance can make colors look more natural.
But don't remove all warmth if warmth is part of the restaurant's atmosphere.
Keep texture realistic
Excessive sharpening and clarity can make food look artificial.
The goal is not maximum visual intensity.
The goal is appetizing realism.
A useful final question is: if a customer ordered this dish and saw the real version, would the photograph feel accurate?
If the answer is no, the editing has probably gone too far.
Can AI Improve Smartphone Food Photography?
Yes.
AI can help restaurants improve smartphone food photography in several ways.
Depending on the tool, AI may be able to:
- Improve lighting
- Correct colors
- Clean backgrounds
- Change environments
- Adjust composition
- Increase image resolution
- Create visual consistency across multiple dishes
But not every AI food photography tool works in the same way.
Some tools simply enhance the original photograph.
Others replace the background.
Some create new restaurant environments.
Others generate entirely new food images.
For restaurants, that distinction matters.
If an image represents a dish that customers can order, the final result should still accurately represent the real food.
AI should improve presentation without creating misleading expectations.
For a detailed explanation of the different approaches, see our AI Food Photography for Restaurants: Complete Guide 2026.
How FoodyFocus Works With Smartphone Food Photos
FoodyFocus is designed around a simple idea: restaurants already have the most important things needed to create their visual content, their real food and their real space.
The process starts with a smartphone photograph of the actual dish.
The restaurant can also provide images of its interior, allowing FoodyFocus to create polished food images within a visual environment connected to the restaurant itself.
The basic workflow is:
- Photograph your actual dish with your smartphone
- Upload the image
- Generate polished visual alternatives
- Review the results for dish accuracy
- Select the image that best represents your restaurant
- Export it for the channel where it will be used
The objective is not to replace the real dish with an imaginary one.
It is to help restaurants turn everyday smartphone photography into more consistent visual content without organizing a professional photoshoot for every menu update.
For a detailed walkthrough, see How FoodyFocus Works: Generate Restaurant Photos From Your Phone.
How to Take Food Photos for Different Restaurant Channels
One of the most common mistakes restaurants make is assuming that one photograph should work everywhere.
Different channels have different visual priorities.
Food delivery apps
For delivery platforms, clarity is critical.
The customer should immediately understand what they are ordering.
Prioritize:
- Clear view of the dish
- Simple composition
- Accurate representation
- Good lighting
- Minimal distractions
Different platforms may have different technical and content requirements, so check the current specifications before uploading.
FoodyFocus has separate guides covering restaurant photo requirements for platforms including Uber Eats, Glovo, Deliveroo, DoorDash, and Just Eat.
Google Business Profile
Google is often where customers form their first impression of a restaurant.
Food photos matter, but they shouldn't be the only images.
A strong restaurant profile can combine:
- Signature dishes
- Interior
- Exterior
- Bar
- Staff
- Atmosphere
When photographing food for Google, consider showing enough of the environment to help users understand the restaurant experience.
Instagram and social media
Social media allows more creative freedom.
Experiment with:
- Close-ups
- Wider environmental images
- Hands interacting with food
- Table scenes
- Multiple dishes
- Vertical compositions
Not every image needs to look like a menu photograph.
Social content can show more personality and context.
Restaurant websites
Website photography needs consistency.
A single great photograph is useful.
A collection of 30 photographs with completely different lighting, backgrounds, and styles can create a fragmented brand experience.
When photographing menu items over time, try to maintain:
- Similar lighting
- Consistent backgrounds
- Related camera angles
- A coherent color palette
This is one area where a structured photography or AI workflow can help.
10 Smartphone Food Photography Mistakes to Avoid
1. Using direct flash. Direct smartphone flash often creates harsh, flat lighting and strong reflections.
2. Photographing under mixed lighting. Combining daylight with warm artificial lighting can create inconsistent colors.
3. Using digital zoom. Digital zoom can reduce image quality. Move closer whenever possible.
4. Forgetting to clean the lens. Fingerprints and grease can make otherwise good photographs look hazy.
5. Using the wrong angle. Choose an angle based on the dish. A burger and a pizza shouldn't necessarily be photographed the same way.
6. Ignoring the background. Look behind the food before pressing the shutter.
7. Over-editing. Too much saturation, sharpening, or AI enhancement can make food look artificial.
8. Waiting too long to photograph the dish. Food changes quickly after plating. Photograph it while it is fresh.
9. Creating only one composition. Take several angles and distances while the dish is available.
10. Making the food look better than reality. The objective is to present the dish at its best, not to advertise a product the kitchen doesn't actually serve.
The 60-Second Restaurant Food Photography Checklist
Before photographing a dish, use this quick checklist.
Before shooting:
- Clean the camera lens
- Photograph the dish while it's fresh
- Clean the edges of the plate
- Check that important ingredients are visible
- Find the best available light
- Remove unnecessary objects from the background
While shooting:
- Use the main rear camera
- Avoid digital zoom
- Tap the dish to focus
- Check the exposure
- Try overhead, 45-degree, and low angles
- Take both close and wider compositions
Before publishing:
- Compare the image with the real dish
- Check ingredients and portion accuracy
- Make sure colors look natural
- Check the background for distractions
- Crop the image for the correct platform
- Confirm the image meets the platform's current requirements
Frequently Asked Questions About Smartphone Food Photography
Can you take professional food photos with an iPhone?
Yes. Modern iPhones and other high-end smartphones are capable of producing excellent food photographs, particularly for digital menus, websites, Google profiles, social media, and delivery platforms.
Lighting, composition, camera angle, and food presentation usually have a greater impact on the result than simply owning more expensive camera equipment.
What is the best phone camera setting for food photography?
For most situations, use your phone's main rear camera, avoid digital zoom, tap the dish to focus, and manually adjust exposure if necessary.
Using grid lines can also help with composition and overhead photography.
Should I use portrait mode for food photography?
Portrait mode can work well when you want to separate the dish from the background, but it should be used carefully.
Smartphone software can sometimes incorrectly blur plate edges, cutlery, garnishes, or parts of the food.
Always inspect the image closely before using it.
What is the best angle for photographing food?
It depends on the dish.
Overhead photography works well for pizza, flat dishes, bowls, and table spreads.
A 45-degree angle is versatile for most plated dishes.
Low angles work particularly well for burgers, sandwiches, cakes, drinks, and other foods where height and layers are important.
How do you photograph food in a dark restaurant?
Start by moving the dish closer to available natural light if possible.
If more light is needed, consider a small continuous LED light or reflected light rather than direct smartphone flash.
Dark environments may also require the phone to use slower shutter speeds, so keep the camera steady.
Should you use flash for food photography?
Direct smartphone flash is generally not ideal for standard restaurant food photography because it can produce harsh reflections, flat lighting, and strong shadows.
Soft natural light or a diffused continuous light source is usually easier to control.
Can AI improve food photos taken with a phone?
Yes. AI tools can help improve lighting, color, backgrounds, composition, and visual consistency.
However, restaurants should review AI-assisted images carefully to ensure that the final photograph still accurately represents the real dish.
Read our Complete Guide to AI Food Photography for Restaurants to understand the different types of AI food photography and how restaurants can use them.
What size should restaurant food photos be?
The correct image size depends on where the photograph will be published.
Instagram, Google Business Profile, restaurant websites, and delivery platforms may use different dimensions and aspect ratios.
Keep a high-resolution original whenever possible and create channel-specific versions from that master image.
Good Food Photography Starts Before the Editing
You don't need a professional camera to start creating better restaurant photography.
You need a good process.
Start with the real dish.
Photograph it while it's fresh.
Find the best available light.
Choose an angle that shows what makes the food distinctive.
Simplify the background.
Take several versions.
Then edit carefully.
AI can help improve lighting, environments, backgrounds, and consistency, but it works best when it starts with a strong photograph.
The most effective workflow is therefore not: take a bad photo, then ask technology to fix everything.
It is: prepare the real dish, take the best smartphone photo you can, improve or transform it when necessary, check that it still represents reality, and export it for the right channel.
Whether the final image is created entirely with your smartphone, professionally edited, or improved with AI, the objective remains the same: make the food look worth ordering, and make sure the real dish can live up to the photograph.
Already have smartphone photos of your dishes? Learn how AI food photography for restaurants works, compare the best AI food photography tools, or try FoodyFocus to see how your own dish can become part of a more consistent restaurant visual library.
